What is the project about?
In the Reverse Engineering project Each person in class brought in an item to break apart and if you didn't have one you were given one. I was given a calculator that I took apart and sketched: however, this was only the beginning because after that day each group picked one item within their group to go in depth on and break apart to learn how it works, what its made of, and how it was assembled. My group chose a Zippo Windproof Lighter to take apart, see the insides, sketch, and improve. Along with breaking apart and analyzing our item we had to think of a way to improve our item so my group decided to make a way to change the color of the flame serving the purpose of being interesting or "cool."
Presentation
Report
Alexis Bishop
Bryce Bernales
Joaquin Arellanes
Landon Antonio
Reverse Engineering Report
Zippo Windproof Lighter
Device Description:
The Zippo windproof lighter is a simple yet slightly mechanically complex item that produces a stable flame. The Lighter consists of the brass outer casing which holds the stainless steel inner casing that contains all of the smaller parts.
Bill of Materials:
-Outer Casing(bottom):The Bottom of the Outer casing is made of brass and holds the inner casing.
-Outer Casing(lid):The Outer lid is for putting out the flame and keeping the lighter closed.(Made of brass)
-Outer Casing(hinge & hinge pin):The hinge/hinge pin makes it so the lid is connected to the bottom and can open and close easily.(Made of stainless steel)
-Inner Casing: Body that holds all other components(made of stainless steel)
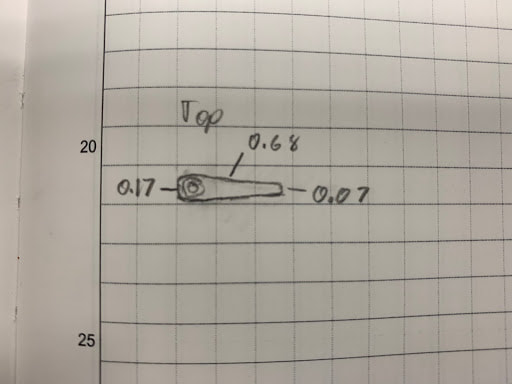
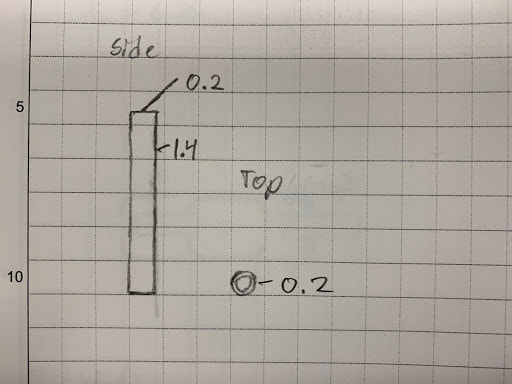
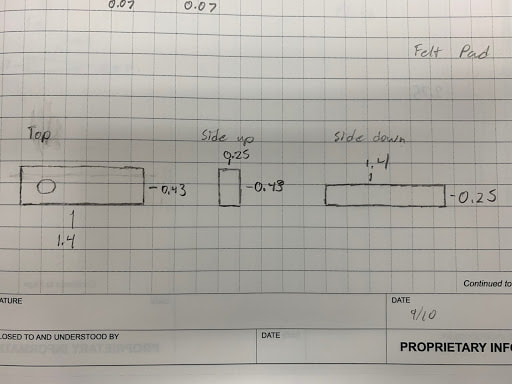
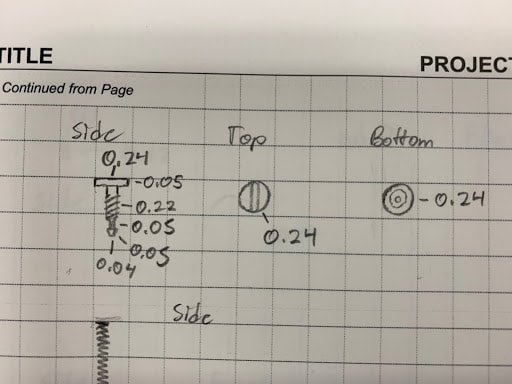
-Screw: Screws in at the top of the felt pad.
-Flint Spring: Attaches to spring tip and screw, which allows the flint to be pushed to plate
-Spring Tip: Holds the flint at the end of it.
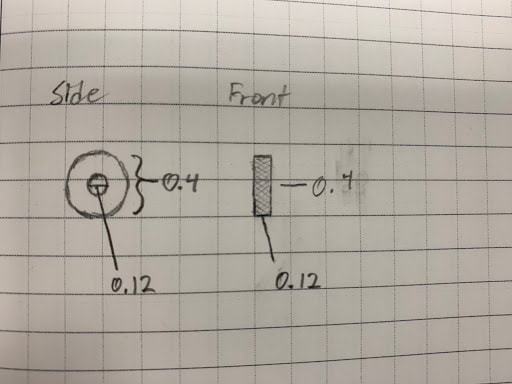
-Flint piece: The flint is essential, when the wheel strikes it, it creates a spark.(Made of flint)
-Tube and Tube Insert:The Tube holds the flint piece,the spring tip, the flint spring , and is capped off by the screw. The tube insert is what holds the tube in the lighter inner casing.(Made of brass)
-Rayon Balls:The Rayon balls are what hold the fuel or the lighter fluid making the lighter produces flame easily.(made of Rayon fiber)
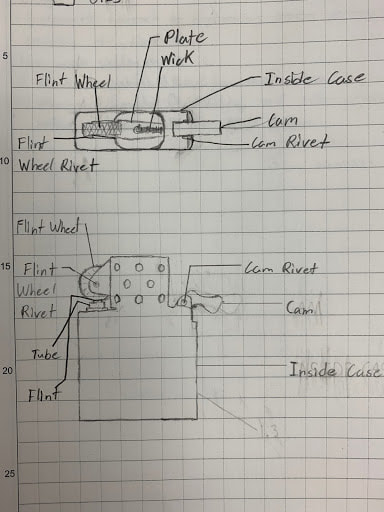
-Plate: The plate lays a foundation for the wheel and rivet to lay on.(stainless steel)
-Cam & Cam rivet:The Cam allows the lid to close and open or holds the lid open(stainless steel)
-Cam Spring:Part of the cam to cause it to be spring loaded.(stainless steel)
-Flint wheel & Flint wheel rivet: The Flint wheel is the thing that when struck produces sparks which produces the flame.(flint) The Flint wheel rivet holds the Flint wheel in place.(stainless steel)
-Eyelet:The Eyelet holds the wick in place.(brass)
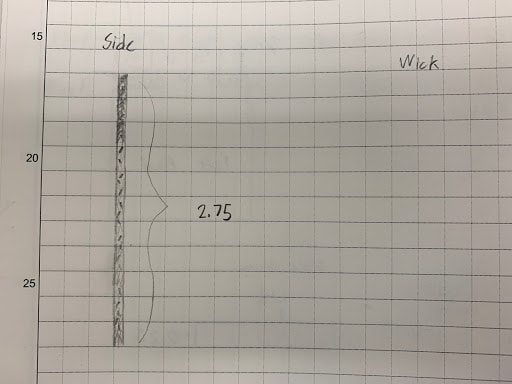
-Wick: The wick, when soaked with fluid, catches spark created by flint, and administers the flame.(fiberglass yarn)
Procedures:
The device is rather simple and straightforward. First, the inner casing has to be exposed, this is done through flipping the outer casing open. After this, all that needs to be done to ignite the flame is push your thumb down on the flint wheel, creating a spark from the flint, and provided that there is lighter fluid in the device, the wick should catch this spark and administer the flame.
Design Process:
It started when we first disassembled our object in August to see how it worked and how it could potentially be improved on. Our group talked about how interesting it would be if we changed the color of the flame. We brainstormed for awhile about how we could change the color of the flame. Afterwards, we spoke about times when your sitting around a fireplace and having special pinecones covered in a certain chemical that causes a reaction with fire to change the color of it. Then we realized this is how we could do it; use the chemical or item we needed to change the flame to the color we wanted. Consolidating the chemical or item within the top of the lighter where the flame resides. We began focusing on the cap or lid for contraption that would sit on top of the lighter to hold the chemical. Therefore, coming to an agreement on a cap that has a metal ring with mesh or paper material on the inside of the ring holding the chemical. The ring matches with the top of the lighter so it could easily fit on top of the edge creating a filter. Lastly, our group needed to figure out what chemicals and items we needed to accomplish our task. We found that for a yellow/green effect we needed Borax or Boric acid, a yellow flame needed just table salt, and for a red flame we needed epsom salts. Overall, we have all the information needed for our idea in order to bring into reality.
Conclusion:
Although a zippo lighter isn’t in itself very complicated, it has many moving parts that all have to play a very specific role in order for the whole mechanism to work. It honestly wasn’t too difficult to come up with the redesign, so that was an aspect that went well. One of our biggest challenges was figuring out how to distribute the workload, at many times, we were a bit at odds with each other, but in the end, we figured it out. I suppose, if we end up working on the redesign together, something that we could work on would be planning with each other better.
Bryce Bernales
Joaquin Arellanes
Landon Antonio
Reverse Engineering Report
Zippo Windproof Lighter
Device Description:
The Zippo windproof lighter is a simple yet slightly mechanically complex item that produces a stable flame. The Lighter consists of the brass outer casing which holds the stainless steel inner casing that contains all of the smaller parts.
Bill of Materials:
-Outer Casing(bottom):The Bottom of the Outer casing is made of brass and holds the inner casing.
-Outer Casing(lid):The Outer lid is for putting out the flame and keeping the lighter closed.(Made of brass)
-Outer Casing(hinge & hinge pin):The hinge/hinge pin makes it so the lid is connected to the bottom and can open and close easily.(Made of stainless steel)
-Inner Casing: Body that holds all other components(made of stainless steel)
-Screw: Screws in at the top of the felt pad.
-Flint Spring: Attaches to spring tip and screw, which allows the flint to be pushed to plate
-Spring Tip: Holds the flint at the end of it.
-Flint piece: The flint is essential, when the wheel strikes it, it creates a spark.(Made of flint)
-Tube and Tube Insert:The Tube holds the flint piece,the spring tip, the flint spring , and is capped off by the screw. The tube insert is what holds the tube in the lighter inner casing.(Made of brass)
-Rayon Balls:The Rayon balls are what hold the fuel or the lighter fluid making the lighter produces flame easily.(made of Rayon fiber)
-Plate: The plate lays a foundation for the wheel and rivet to lay on.(stainless steel)
-Cam & Cam rivet:The Cam allows the lid to close and open or holds the lid open(stainless steel)
-Cam Spring:Part of the cam to cause it to be spring loaded.(stainless steel)
-Flint wheel & Flint wheel rivet: The Flint wheel is the thing that when struck produces sparks which produces the flame.(flint) The Flint wheel rivet holds the Flint wheel in place.(stainless steel)
-Eyelet:The Eyelet holds the wick in place.(brass)
-Wick: The wick, when soaked with fluid, catches spark created by flint, and administers the flame.(fiberglass yarn)
Procedures:
The device is rather simple and straightforward. First, the inner casing has to be exposed, this is done through flipping the outer casing open. After this, all that needs to be done to ignite the flame is push your thumb down on the flint wheel, creating a spark from the flint, and provided that there is lighter fluid in the device, the wick should catch this spark and administer the flame.
Design Process:
It started when we first disassembled our object in August to see how it worked and how it could potentially be improved on. Our group talked about how interesting it would be if we changed the color of the flame. We brainstormed for awhile about how we could change the color of the flame. Afterwards, we spoke about times when your sitting around a fireplace and having special pinecones covered in a certain chemical that causes a reaction with fire to change the color of it. Then we realized this is how we could do it; use the chemical or item we needed to change the flame to the color we wanted. Consolidating the chemical or item within the top of the lighter where the flame resides. We began focusing on the cap or lid for contraption that would sit on top of the lighter to hold the chemical. Therefore, coming to an agreement on a cap that has a metal ring with mesh or paper material on the inside of the ring holding the chemical. The ring matches with the top of the lighter so it could easily fit on top of the edge creating a filter. Lastly, our group needed to figure out what chemicals and items we needed to accomplish our task. We found that for a yellow/green effect we needed Borax or Boric acid, a yellow flame needed just table salt, and for a red flame we needed epsom salts. Overall, we have all the information needed for our idea in order to bring into reality.
Conclusion:
Although a zippo lighter isn’t in itself very complicated, it has many moving parts that all have to play a very specific role in order for the whole mechanism to work. It honestly wasn’t too difficult to come up with the redesign, so that was an aspect that went well. One of our biggest challenges was figuring out how to distribute the workload, at many times, we were a bit at odds with each other, but in the end, we figured it out. I suppose, if we end up working on the redesign together, something that we could work on would be planning with each other better.
Sketches


Reflection
In this Project I personally worked well on the jobs I was given and produced quality work. One thing I did quite well in the group was communication, meaning I communicated well with teammates and interpreted work into words. A second thing I did well would be that I gave extra help where it was needed meaning that if somebody needed some help or was slacking only slightly I helped them out. Even though I have these things I did well I also have some things I did poorly and need to fix next time. One being that I didn't finish my work in a timely manner, not that it was late but it could've been done faster to help the project go along smoother. Another thing would be that I don't present well and practicing beforehand would be a good idea. Overall this project was good in that it showed me what i'm doing well at, what i'm doing poorly at, and almost everything about a Zippo lighter.
